Monday, May 19, 2008

12 Steps

That's how many steps it takes to get my wort down into the basement of our Merced office for summer fermentation. Cooincidence that it's the same number of steps to combat alcoholism? I think not! ;-)

Why take it down there? Well, the ambient temp is between 63-66 degrees and that's just right for fermenting beer in the summer time.

Here's the wort all safely buckled up and ready for the ride to the office. Thank goodness for the carboy carrier/cover. This made it easier to carry to the car and will keep the sunlight off of the wort for the ride. I had the air conditioner in the car set for 60 degrees. That was one cooooooold ride!


Here's the yeast starter riding on the floor. Not a very good view from down there! ;-)


Yep. Those are some steep, narrow steps down to the basement!


The view from the first landing down to the basement.


The basement. The wort's home for the next three weeks while the little yeasties eat, fart, and procreate. What a life!


The Nut Brown Ale will join this Light Ale behind the decorative heater in the corner. Hopefully the kids will keep their hands off!


I'm done brewing for a while. I've got five gallons of English Bitter on tap with five gallons of Light Ale being kegged this Thursday. The Nut Brown will ferment for three weeks and be on the CO2 for two weeks before I even pull a pint.

Why am I done brewing for a while? Well, for one, I've got enough beer for now. With the hot summer days coming up I'm sure it will disappear soon, but I've got gear to buy if I'm going to have more than five gallons on tap. I'll be buying a small chest freezer, temp controller, taps, beer line, etc, etc, etc to build a 4-tap kegerator. It's got to look nice so that I can keep it in the house so I'll be painting it black and putting some wood/stainless steel finishing touches on it. Pics to come soon after I'm done with the purchases. That could take a while though!

Tuesday, May 6, 2008

Eye Surgery?

Nope. This is a picture of the inside of a keg of Pale Ale that kicked last weekend. Such a mess from such a clear and fine brew.

Sunday, May 4, 2008

"No Yeller" Light Ale

Today was a GREAT brew day! I've finally got to the point where I don't get very nervous when brewing. I usually stress from the time I start getting the brew pot out until I put it away at the end of the day. What's different? I think I've brewed enough times that I have my process down and everything just falls into place. I usually yell at the kids and get very frustrated. Today was truly a trying day with four 8 year old girls running around the house and in the swimming pool. But, I pulled it off: no yelling or stressing out at all today! So, to celebrate I'll name this brew No Yeller Light Ale. Catchy, huh? ;-)

Always Make a Starter

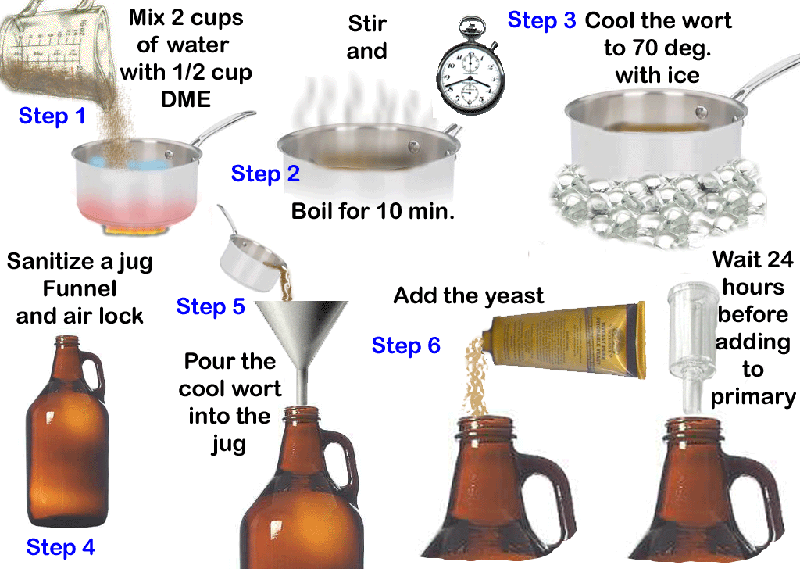
A "starter" is a small batch of beer that allows yeast to propagate and get ready to go to work on the 5.5 gallons that they will be married to in the fermentor. A special thanks to Greg Muller for posting his version of how to make a starter and of course my Modesto Mashers buddies for answering my hundreds of questions about homebrewing and making starters. Here's the process that I've used a couple of times now:


Boil 2 cups of water and 1/2 cup of light malt extract for 10 minutes. Make sure not to leave this even for a second or you'll have a boil over of hot-sticky crapola on your stove that will take about 3 days to scrub off. It doesn't make the wife very happy when you do this!


Cool the wort in an ice bath for about 10 minutes. This brought the temp down to 64 degrees.


Here's the yeast we're working with on this beer. White Labs "California Ale", WLP001. Make sure this is about the same temperature as the wort.


Pour the wort and the yeast into a steralized container. I use an empty Martinelli's Apple Cider jar.


Shake vigorously to airate the wort/yeast mixture. This is what it looks like after I shook it 300 times. What a workout!


Let the starter sit for 24 hours before pitching (putting) the whole mixture into the fermentor with the completed wort for your beer. If you want to pitch only the yeast slurry and not the nasty little starter beer then let it sit for 48 hours and "cold crash" the mixture in the fridge for 24 yours to drop the yeast out of suspension. Pour off the nasty beer and save the yeast slurry in the bottom.

Light Ale Brew Day


The recipe and the brew day timer making sure I don't forget any hop or other additions to the brew.


7.1 gallons of brewing yumminess!


Just for you Dano! This is my brew day view. Lovely, isn't it? ;-)


The only plants we have in our back yard!


Back to brewing! Here's the finished wort getting transferred into the carboy. Notice the Carboy Carrier around the glass. It makes it sooooooooooo easy to carry the carboy and keeps out the sunlight so the beer doesn't skunk. One of the best purchases I've made so far! I'm sure to get another next month.


What's left in the brew pot after all the wort's gone. It looks nasty but smells wonderful! They should make Potpouri in this scent!


The four brewing beauties! It doesn't take landscaping to make kids happy. A pool and some friends and you're set for the day!

Sunday, April 27, 2008

2 Brewing Firsts in One Day

Today was a good day. I had two brewing firsts today. First I followed my friend Mark's advice and used CO2 to "push" my beer from the carboy into the keg. Second I actually have two beers done and on the CO2 at one time! The second beer (English Bitter) isn't ready to drink for two more weeks and the Pale Ale is almost gone. I think it's about 1-2 glasses away from going ppffffttt!

Here are the pics from the day:

A stainless steel T splits the gas line in two.


Two beers in the fridge! They barely fit!


The CO2 Push Setup


The beer flowing from carboy to keg.


Almost done!


A full keg is a happy keg! The foam on top is from Star San - a no-rinse sanitizer.


The transfer only took about a minute with 1 lb of pressure from the CO2 canister. I'm going to invest in a quick disconnect for the CO2 so I can move the caniser around and not have to cut the cut the hose each time.

Up next: Two brews in one month, another first! A Nut Brown Ale for flavor and a Light Ale for those long summer days by the pool!

Friday, April 11, 2008

Mi-Wuk Pale Face Tasting Notes

This beer took a turn for the better tonight. It lost it's edge and the bitterness mellowed quite a bit. Like it all the sudden just decided to pull together. Here are the final tasting notes.

Thursday, April 10th @ 8 PM - Watching American Idol with my son.

This beer is now pouring an amber color with 2 fingers of head which quickly reduced down to about 1 finger. The aroma is lightly hoppy with the faint smell of fresh cut grass. Mouth feel is medium with slight bitterness and good hop character and a backdrop of light malt. It finishes nicely with a little bitterness on the back of the tongue. The lacing barely clings down the sides of the glass, not sticky, just a little foamy. I'm sure this beer will get even better with a few more weeks in the keg - if it lasts that long!

Monday, April 7, 2008

General Brew Related

OK, so I brewed again. This time it was an English Bitter that tasted so good before I put it in the fermenter that I almost didn't wait for the yeast to do it's job before I had a pint!

In other news, I've got a new brew spot! It was REALLY windy this weekend so I decided to brew in the garage. I think I've found the perfect spot. Very little wind, nice ventilation, and the TV is mounted up in the corner. Just works out great!

The English Bitter Recipe. Yum!


(EDIT) - Whirfloc should not be added to the mash, but rather to the boil with 15 minutes left. This helps the hotbreak clump up and settle to the bottom so you don't get so much in your carboy. Thanks Mark for pointing out this error on the recipe sheet!

Lots o' room for the brew gear box


The mashtun on top of the dog crate. BTW, I think I can get one more good brew session out of this cooler. It's starting to buckle on the inside and I've got a few cracks developing along the top walls of the cooler. Not bad for a 19 year old cooler we got as a wedding present! Here is what will replace it.


Got the laptop setup on the quad to keep track of recipes, run the Brewday Timer, and hit up the forums whilst I brew!


Oh, yeah, the Pale Ale is doing fine. I had a friend over this Saturday after our son's baseball games and we had a few pints. I think it needs a couple of weeks to blend/mellow before I'll pass any more out or bottle any for the homebrew club and friends. I've still yet to get a couple of beers to Mr. Kirby and the Burdicks and I'm starting to feel bad about that since they helped me out by giving me some of my original equipment. Don't want to give them beer with that sharp flavor though! Honestly guys, it's coming soon!

Thursday, April 3, 2008

Mi-Wuk Pale Face

It's official, this has got to be the best pale ale I've ever tasted! Lighter than SNPA with more of a hop presence. The Magnum and Glacier hops shine through without being over powering. It pours a golden/copper color and smells slightly of fresh cut grass. It still has a slight yeast taste that will become less pronounced as the keg clears. It has head medium retention and a nice lacing down the side of the glass as you drink it.


I'm naming this beer Mi-Wuk Pale Face. A play on words for our favorite place - our cabin in Mi-Wuk, and the fact that two pale faces (my son and I) brewed it. It's also the first he's tasted when we were checking the OG before it went in the carboy to ferment. He looked at me and said "Not too bad."

I'll enjoy this beer as I brew an English Bitter this weekend.

Two good beers in a row, I am stoked!